VirtualBoss Getting Started and Usage Guide
Latest Software Release: v5.08 build 459
Task Reminder feature added!
New Remote VirtualBoss
You can choose to print this guide, or use this page as a reference should you need help. This page will be updated often when new information is available.
If you read these instructions, you'll learn tips
that will help you master all that VirtualBoss has to offer. Some users
start learning about Virtualboss just by adding tasks. Many users start
by adding simple things like punch list items and other miscellaneous
tasks. If you want to take this approach, see the paragraph below titled:
Tracking punch list, service, waranty, and
Misc tasks.
To see pricing or to purchase VirtualBoss, head on over to our online store. You can also contact our Customer Service Department via email or get in touch with us directly.
Guide Font Size:
Categories:
Overview
VirtualBoss is an easy to use scheduling and task management software that is actively developed and continually updated! Designed by a real contractor and used by professionals, VirtualBoss is great for scheduling and keeping track of all your tasks (major scheduling items, punch lists, service call items, warranty items, administrative tasks, ect.). Forget about sorting through endless sheets of paper to figure out who needs to do what, when, and where; you'll never have to worry about forgetting what needs to be done again. With VirtualBoss, and a couple of well place keyboard strokes, you can easliy look up what needs to be done. You can also use VirtualBoss to fax and email your work orders, it's a great communication tool! VirtualBoss will run on any Windows PC (XP/Vista/7). While there is no Apple variant of the software, you can run VirtualBoss on a mac using a special software letting you run windows programs on your macs. You can also use VirtualBoss on your mobile devices like android and iphone, or tablet devices with Remote VirtualBoss
VirtualBoss Basics
VirtualBoss stores a list of tasks that cover everything you need to do and have done. Major scheduling items, punch lists, service call items, warranty items, administrative tasks, ect., all of these are stored on our Task Manager. You can set dependencies using our Linking system so that entire schedules (or just a single item) can update when a schedule is modified. VirtualBoss has a Job Manager where all your Job information is stored. Our Contact Manager is used for saving all your contacts information like email addresses, phone numbers, home addresses, whatever you'd like. Each task in VirtualBoss can be assigned a contact and a Job. When you assign a Job to a task, that's the same as saying this task belongs in that Job. By assigning a contact to a task, you're saying that this person is the one performing the work. They will receive work orders or schedules when you decide to email/fax that item. Since all your tasks for all your jobs are stored in one place, you'll want to use the Filter options to only show you the information you're looking for very quickly.
Setting Up Your First Schedule In VirtualBoss
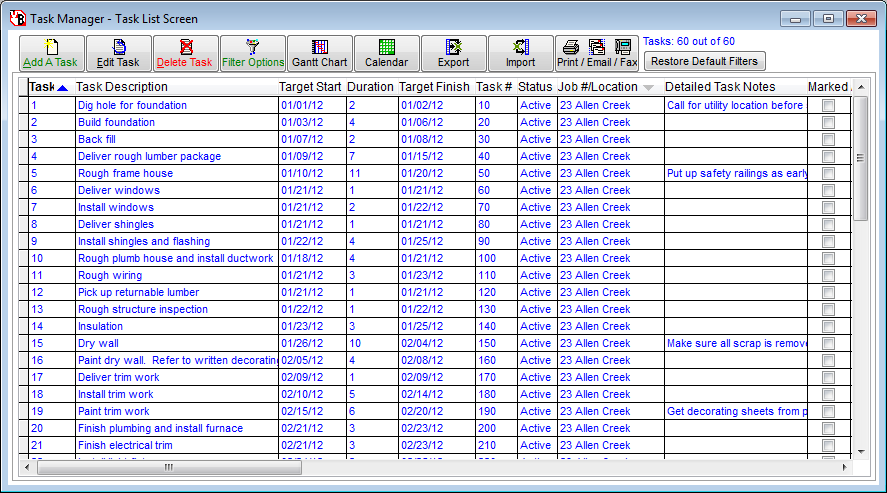
The first screen you'll see when you open VirtualBoss (aside from this guide) will be the Task Manager - Task List Screen. Initially, this list will be empty; we have no jobs or tasks yet.
Before we start adding tasks, let's take a moment to explain what the Task List screen is. The VirtualBoss Task Manager Task List Screen (often refered to as just Task Manager) is the main hub for all of your schedules. Every task for every job will be viewable from here. You will do most of your work, and spend most of your time, within this area of the software.
You can get to the Task Manager at any time by clicking "Task
              Manager" from the top of the program.

Now that you have a basic understanding of what the Task Manager is, let's look at how to use it! This brings us back to setting up our first schedule. There are many ways to start building a schedule in VirtualBoss, this guide will cover one of those ways. When starting a new schedule from scratch, the best place to begin is the Job Manager. Before we can start building a schedule, we will need to create the Job that these future tasks will belong to. Click the Job Manager menu button at the top of the program to open it. This item is found right next to the Task Manager menu button (see above image for a reference)
Once you come to the Job Manager screen, you may notice this list is empty. Like the Task Manager, the Job Manager screen is the main hub for all of your Jobs. In most cases, you will only need to use the Job Manager when adding new jobs or editing your existing job information.
Let's begin our new schedule by creating our job. Click on the Add a Job button in the upper left corner of the Job Manager window. In the window that comes up next, enter a name for your new job. This can be anything you like, but it is a good idea to name it something that is both meaningful and easy to remember.

Once you've decided on a suitable name for your Job, press Ok. The next window that comes up will be your Job Details window. This screen is where you'll enter any and all details for this job. To keep things simple, you do not need to fill anything else out about your job. Just hit Ok to save and close that window.
You should now be back on the Job Manager screen. You should also see the job you just created at the top of the list. Now, it is time to continue building the schedule around this job. Let's close the Job Manager for now and go back to the Task Manager. Click on the Task Manager menu button.
Once back at the Task Manager, click on Add a Task in the upper left corner of the window.
This will bring up the Task Details screen. This window is where you can fill out any information about your task. We will go into more detail about the task details screen in another section of this guide. For now, we're going to focus on just two fields of this details screen. The Task Description and Job # / Location fields. Start with the Task Description field. Use this field to enter a brief description of what this task is all about. Next, in the Job # / Location field, use the drop down option to choose the job you created earlier in the Job Manager. We created the job first so we could use it when creating tasks. This concept is very important in understanding how VirtualBoss builds schedules. By choosing a job in the Job # / Location field, you are assigning this task to that job.
You should now have a task that looks something like this:

At this point, you can hit the Ok button to save and close the new task. This will take you back to the Task Manager screen where you should now see the task you just created.
That's it!
You've just added a task to your schedule and are well underway! Continue adding more tasks the same way you just did and you'll have a completed schedule in no time! Just remember to always assign each task to a job by using the Job # / Location field. This is how VirtualBoss knows which tasks belong to which job. If you want to learn more about the task detail screen, jump to our Task Detail section.
To view a quick video of creating a job and adding a task to it, click here
Task Detail Screen
This section will break down each field of the Task Detail Screen and give you a description of what each one does. This is a good section to familiarize yourself with as you'll learn what each field does and how it can affect your schedules.
Task Description:

Job #/Location:

Company / Person's Name:

You can add new contacts quickly from this screen. Just start typing a contact or company name in the Company or Person's Name field and if it's not found, VirtualBoss will ask you if you want to add it. This method is referered to as "On the fly" contact adding. You can also do the same for Jobs.
The "Company" field and "Person's Name" field are linked to the same contact. This means that when you assign a contact to a task, you can choose either of these fields to do so. Each contact in VirtualBoss has a field for their name and what company they work for. When you assign a contact to a task, it will fill in the appropriate information for that contact. You can choose to either look them up based on their Company name, or their personal name.
Task ID
Useful Tip:
            It doesn't matter what order you enter
            your tasks.
Status
Useful
            Tip: VirtualBoss only shows Active tasks by default. Done tasks
            are hidden from view and do not show up on the Task List. To see Done
            tasks, you'll need to open the filter options and choose to show done
            tasks. This will be covered in detail in a later section.
Target Start Date
Duration
Target Finish
Actual Finish
Task #
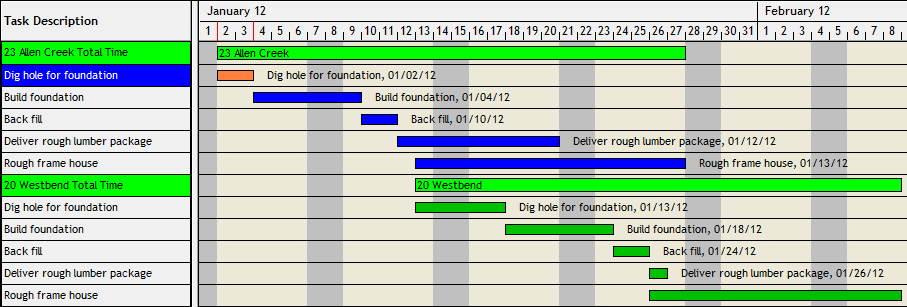
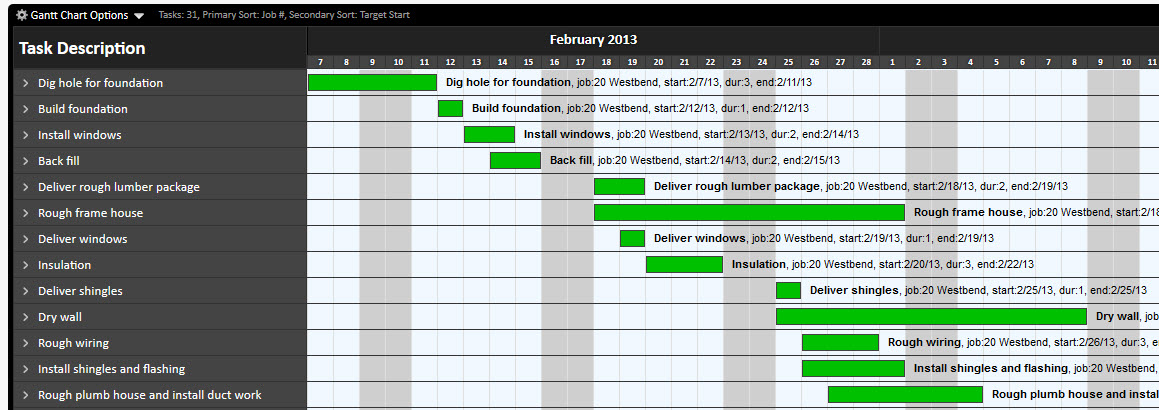
Here's an example of 2 schedules with Task #s.

In this example, tasks #s were given in increments of 10. If you wanted to insert a task between Dig hole for foundation (10) and Build foundation (20), you would simply give your new task a task # of 15. You can also use decimals for task #s like 1.5 or 2.3.
Useful Tip: You can sort your task
        list by any column you see. Just click the top of the column and your list
        will be ordered either ascending or descending. Sorting by the Task # field
        is a great way to always have your tasks appear in the order you gave them!
Requested By
Notes tab
File Attachments tab
Task Groups tab
Task Groups can be a useful way to organize your tasks even further. By creating and placing a task in a group, you are "grouping" similar tasks together. Much the same way you assign tasks to a job to make a schedule, you can assign tasks into a group for quick filtering access.
In the example below, the "Clean up" group is checked; this task now belongs to the group "Clean up". Any other task you would fit into this category, you could also put in this group. The purpose for doing this is that later on, you can use the filter options to show you only tasks that are part of the "Clean up" group.

Scheduling tab
The scheduling tab is where you can "Link" tasks, creating a critical path through your schedule. There are 2 ways you can link tasks to each other. One way is through the scheduling tab that is found on each task. This tab shows a list of tasks that you may want to choose as a predecessor.
Useful Tip: The list of tasks
          on the scheduling tab are automatically filtered to show the tasks that
          belong to the same job. Some tasks may also be hidden by VirtualBoss to
          prevent conflicts that could create infinite loops.
To link the current task to a predecessor, check the box under the Link column. You may have multiple predecessors for a single task. When you link a task to another, you will change the Start Date to the day after the predecessor task finishes. You can then adjust the start date manually without breaking the link. This can be accomplished by using the plus field on the Scheduling tab.
The second method to link tasks can be done on the Gantt Chart. You can drag and drop tasks to create links very quickly.

You can adjust things such as Start Date by dragging a task bar left or right, or change the Duration by increasing or decreasing the length of the task bar. Any task that is linked will have its Start Date adjusted if its predecessor changes. By linking your tasks together, you can adjust entire schedules automatically if something changes!
Here is an example of a schedule with multiple linked tasks:

Email & Fax tab
Custom Fields tab
Secondary Assignees tab
Task Manager - Task List Screen
The Task Manager (also referred to as Task List Screen) is one of 3 main Lists in VirtualBoss (Task List, Contact List, Job List). It is where most of your time will be spent when using the program. This list will show all tasks, past/present/future. If you've ever entered a task into VirtualBoss, it can be found on this screen. VirtualBoss keeps all your schedules, tasks, and contacts, in one place. By keeping your resources together like this, you can very quickly find and view any previous schedule with ease. This section will focus on the Task Manager and will show you how you can use it most effectively.
This is the first screen you're shown after starting VirtualBoss. At first your task list will be empty, but that will soon change as you start Adding Tasks.

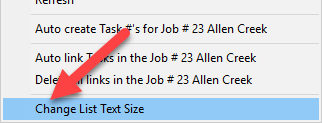
(Helpful tip!) Change Font Size on Task/Job/Contact Manager screens
Add a Task
Useful Tip: You can copy tasks
          you've previously entered rather than creating a new one from scratch.
Edit Task
Delete Task
Filter Options
Gantt Chart
The Gantt Chart is a great way to view your schedules from a more visual perspective. Clicking the Gantt Chart button from the Task Manager screen will take you to our Gantt Chart view. All the tasks showing on the task list will appear in the Gantt Chart view.
Useful Tip: Use the filter options
        before switching to the Gantt Chart to make it easier to view your current
        schedule.
See the Gantt Chart section below for more details.
Calendar
Import and Export
There's a few reasons you may want to import a list of tasks into VirtualBoss. Maybe you already have a task list that you don't want to re-enter, or you're bringing over a task list from another program into VirtualBoss. Or maybe you just like to make changes using Excel. Whatever the reason, there's some things to know when using this feature with VirtualBoss.
You'll need Microsoft Excel installed
on your computer in order to use the importing and exporting feature.
(Trial versions of Excel have disabled the
use of importing and exporting so it will need to be a fully licensed
copy to work)
In order to import tasks into VirtualBoss, you need to have a properly formatted Excel sheet. This can be easily obtained by simply doing an Export of the Task List from VirtualBoss.

The headers cannot be altered or the import may fail. You can choose which fields are included in the export by going to Options, then Preferences, then Field Captions.
In general, there are 2 different outcomes you'd expect from importing tasks into VirtualBoss.
- Adding New Tasks
- Updating Existing Tasks
Adding New Tasks:
If you want to add new tasks to VirtualBoss through importing, leave the Task ID field blank on the Excel sheet. Here's an example:

When VirtualBoss sees a task with no Task ID during an import, it assumes it's a new task and will automatically create a new one, avoiding the possibility of overwriting an existing task.
Updating Existing Tasks:
You may be editing a current schedule in an excel sheet and wish to update your tasks when you import back into VirtualBoss. To update your tasks, leave the Task IDs intact next to each task. Here's an example:

When VirtualBoss encounters tasks with task ID numbers during an import, those tasks will be updated with new information.
Some data fields on the Excel sheet can be left blank when importing. Here's a list of fields you can leave blank, and how VirtualBoss handles it.
| Task ID | Creates new task |
| Target Start Date | Today's date |
| Target Finish Date | Today's date |
| Duration | 1 day |
| Status | Active |
Any field not mentioned is ignored if left blank during import.
Tracking Punch List, Service, Warranty, and Misc. Tasks
VirtualBoss is not just for tracking and communicating major scheduling items (such as "Install Foundation" or "Rough Frame House"). VirtualBoss is great for tracking miscellaneous tasks (such as "Fix dent in front door", "Replace missing knob in kitchen sink", "Replace missing light bulb in basement", or "Update website to include a new floor plan"). Many people initially start using VirtualBoss to track punch list, service, warranty, and miscellaneous tasks, and then expand to scheduling major tasks later.
Some people feel this is the easiest way to learn about VirtualBoss. With this approach, you can make practical use of VirtualBoss within minutes of installing the program. Just click on Add A Task and enter what needs to be done.
You can use VirtualBoss to track punch list items that you keep on a yellow pad of paper. When someone calls, you can quickly filter down to that sub-contractor, employee, or yourself, and see all outstanding tasks for that person for all your jobs. You can even use VirtualBoss to fax or email work orders to this person, telling them exactly what needs to be done.
VirtualBoss can simplify and streamline your punch list and warranty process by giving you a central point where you can keep all your information. If you keep your punch list, warranty, and service tasks in VirtualBoss, you will have a long term record of all tasks for every job and every supplier, subcontractor, and employee. You will be able to find a history and recall everything that ever happened on a job site, or everything that was ever done by a specific person or company. Your contractors, employees, and customers will think it's great; you will no longer forget anything that needs to be done!
If you send somebody to a job site, they will get a list of everything that needs to be done at that site. VirtualBoss does a great job of helping you track miscellaneous administrative tasks in your office. Just set up a job called "Office Work" and start assigning tasks to this job. When you are supervising office operations, all you have to do is filter down to the "Office Work" job.
Print/Email/Fax
You can send work orders or schedules through email or fax using the Print/Email/Fax control panel. This section contains useful information about how to send entire schedules or multiple work orders.
This section has been updated and contains screen shots from version 5.08 build 380.
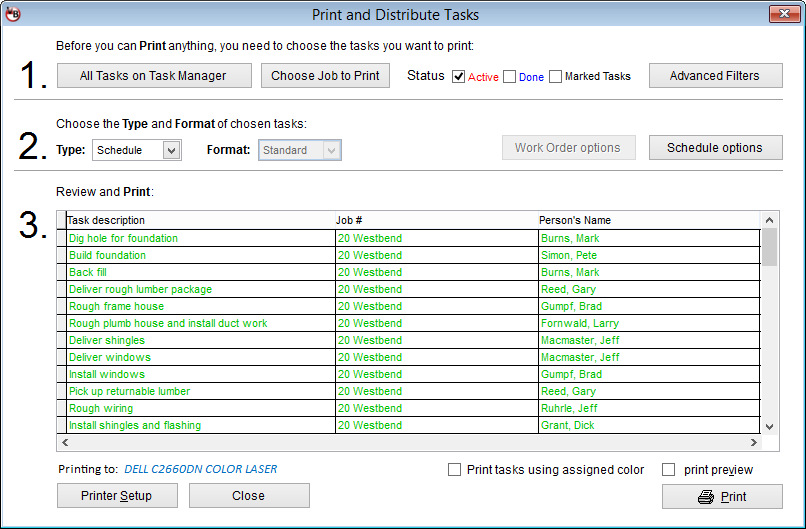
When you click on the Print/Email/Fax button from the Task Manager, you have 3 choices: Print / Email / Fax. Clicking on Print will bring you to the "Print and Distribute Tasks" form.
Printing
You'll notice big numbers on the left side of the window (1, 2, 3). This indicates where you should start customizing what is included on your report, how your report looks, and how you will be printing your report. We'll go over each section below.
1. In section (1), you are choosing the tasks from the Task
Manager to add to your report. Clicking on "All Tasks on Task Manager" will
add all tasks that appear on your Task Manager to the printed report. If you
want to just print one job, click on "Choose Job to Print". This will bring
up your job list where you can select one or more jobs to print. Once you
have chosen tasks, they will appear in section (3).
There are basic filters that can be found in section (1). You have status
filters for active, done, and marked, as well as a button for more advanced
filters. These options are there to further refine your selection of tasks.
When you have chosen your tasks to print, move on to section (2).
2. In section (2), you are choosing the format and type of
your printed report. You have 2 choices for type: Schedule or Work Order.
Schedule type more closely resembles how the Task Manager looks while Work
Order type shows more information about individual tasks. When printing a
single task (or just a couple), use Work Order type. When printing full jobs,
choose Schedule type. There are 3 "Formats": Standard, HTML, and Text. These
options change the theme of the printed report. Standard format has very basic
look. HTML format has a newer (and cleaner) look. Text format prints your
report in very basic text output. We recommend to use the HTML format. It's
important to note that when using the Schedule type, the format drop down
is locked to using HTML. Work Order type can use the Standard, HTML, or Text
format.
There are 2 buttons in section (2) that will let you customize the printed
reports even further. These are the Work Order options and Schedule options
buttons. Click on these options to see more advanced settings.
3. This section is for reviewing the items you are about to print. Any task that appears in the list below will be included on the printed report. You can see what the report will look like by using the Print Preview checkbox, located above the Print button.
Emailing
The Email interface has gone through many design changes in the last few years. The latest iteration more closely resembles a traditional email client layout.
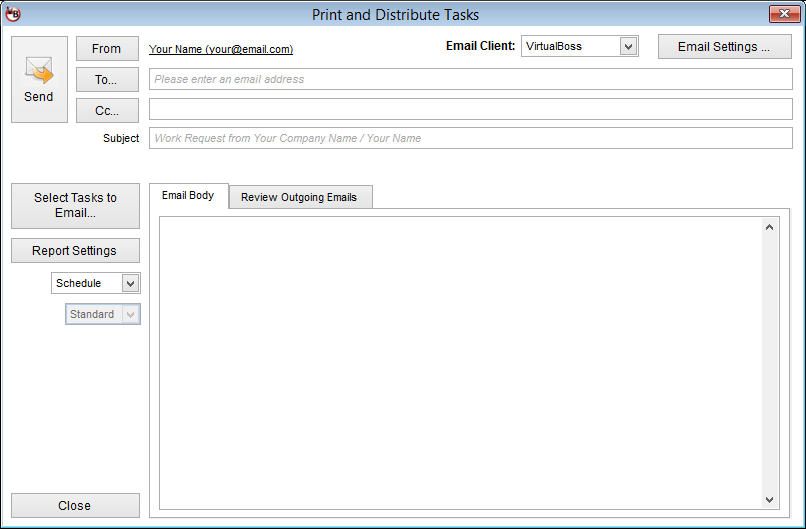
Your software may include a different looking Email interface. The above image is current as of version 5.08 build 390. If you're having trouble with earlier versions of the email interface, please contact support for help.
To effectively send emails from VirtualBoss, you must first select tasks to email. You can do this by clicking on the Select Tasks to Email... button. This will present you with a few choices on how to select the tasks you want to email. The choices include: By Contact, By Job, or by a combination of Filters.
Once you have selected the tasks you wish to email, you need to figure out whom to send them to. To do this, click on the To... button near the top, and choose from a list of choices. These choices include: Assigned Contact(s), Job Owner, or Other. If you choose Assigned Contact, you are saying that you would like to send the selected tasks to the contact that has been assigned to them. Each person will only receive their own tasks. If you choose Job Owner, the tasks will be emailed to the project manager of the job it belongs to. The project manager email information can be found by editing a job in the Job Manager. If you choose "Other", you can pick from any contact record you have in the Contact Manager. This action will send ALL selected tasks to that single email address.
Be careful when sending emails! The software allows you to send hundreds (to thousands) of emails out at once, so make sure you have chosen the correct tasks and recipients before hitting that send button!
You can use the "Review Outgoing Emails" tab above the body message to see an overview of what you are about to send. This will give you details about who is receiving the emails, and how many tasks they will get. It's always a good idea to check this review tab before hitting Send.
Trouble Finding Tasks
If you notice that some tasks you just added aren't showing up on the Task Manager or Gantt Chart, or some jobs seem to be missing, there is a very good chance they are just being filtered out by the Filter Options. VirtualBoss uses Filters to hide tasks. These can be useful when your Task List becomes larger and you only wish to view specific information at any given time.
The quickest way to find these "lost tasks" is by hitting the Restore Default Filters on the Task Manager screen. This action resets all active filters back to default settings which show all Active tasks for all jobs.
The most common scenario of "lost tasks" occur when tasks are marked as Done. By default, VirtualBoss hides done tasks from appearing on the Task List. You'll need to set the filters to show Active and Done tasks to make these appear again. By setting filters to show active and done tasks, you'll see all tasks that are in your database across all jobs.
Configure VirtualBoss Email Client
Filter Options
")
One of the most useful tools in VirtualBoss, the Filter Options let you show or hide any tasks on the Task Manager List Screen. We've designed these filters to be able to show you any combination of tasks you can think of. They are extremely flexible. In the basic view, you can choose to show tasks based on their Job, status, or assigned contact.
Here are some ways you can use the filter options:
- Filter by Job to show only tasks that have been assigned to it.
- Filter by Person's Name to show only tasks that been assigned to that contact
- Filter by Status to show only active, done, or active + done tasks.
More than one filter can be active at a time! (example: try filtering to a Job and a person's name to view tasks they have assigned for that job only)
To quickly show all your tasks again, click Restore Default Filter Settings to clear all active filters.
While the basic filters work for most scenarios, we've provided additional filters to cover any need you can think of!
Job Manager

The Job Manager is dedicated to tracking all your jobs. This is where you'll go when you want to start a new schedule. We recommend to go to the Job Manager when you're ready to start a new schedule. Let's have a quick look at what it's like to create a job in VirtualBoss:
The Job Detail Screen

The Job Detail Screen is where all the details about your job should go. Once a job is created in the job manager, you're free to start assigning tasks to it.
Here's a quick example:
Click on Add Job and give the new job a name.

You can choose to fill out any details about this new job, or, leave it as is and hit ok. You'll notice the job will appear in the Job Manager List.
Now it's time to go back to the Task Manager and click Add Task. To assign this new task to your new job, either start typing the name of the job in the Job #/Location field, or find it in the drop down list.
That's all there is to it!
Contact Manager

There are a few ways to enter contacts into VirtualBoss. You can manually enter them into the Contact Manager or enter them on the fly as you add tasks in the Task Manager. You can also import them from Excel or you can synchronize with QuickBooks Pro and/or QuickBooks Premier. Synchronizing with QuickBooks makes things a lot easier. If you make a change in QuickBooks, it will appear in VirtualBoss; if you make a change in VirtualBoss, it will appear in QuickBooks. Synchronizing VirtualBoss with QuickBooks saves time and keeps information in both programs up-to-date and more accurate.
Keeping information on your contacts in the Contact Manager is a great way to stay organized and manageable. Manually adding contacts into the Contact Manager is a simple process. When in the Contact Manager window, click on the Add a contact button. From here, all you need to do is begin entering contact information. To save time, you can just add in the company name, email address, and fax number (if applicable). VirtualBoss uses this information to send work orders and schedules so it's important to add this information for each contact.
You can also import your contacts from another program if that program is capable of exporting to Microsoft Excel. You can perform a blank export from VirtualBoss' Contact Manager to get a formatted Excel worksheet. Then, just copy and paste the information from one Excel sheet to the other for importing into VirtualBoss.
If your contacts are in QuickBooks, it is very easy to move them to VirtualBoss via the QuickBooks Synchronization Feature. If you want to do this, go to Options and click on QuickBooks Synchronization.
If you are going to be faxing and emailing work orders, be sure to enter the contact’s fax number and email address into the “Work Order Distribution” tab. This is how you tell VirtualBoss where to fax and email work orders and schedules for tasks you assign to this contact.
All information about a contact should be entered in the contact profile; things like emails addresses, phone numbers, home addresses, ect. By entering this information to a contacts profile, this information will be added a task automatically when a contact is assigned to a task.
(Task Detail Screen)

Gantt Chart
 The information displayed on the Gantt Chart is based on what you
see on the Task Manager. We recommend to become familiar with the
Filter Options. This will reduce the
amount of information you need to look at and let you focus on specific
jobs.
The information displayed on the Gantt Chart is based on what you
see on the Task Manager. We recommend to become familiar with the
Filter Options. This will reduce the
amount of information you need to look at and let you focus on specific
jobs. The Gantt Chart is very customizable. You can choose to display more (or less) information, what order your tasks appear in, a specific date range, color of tasks, font and color options, and much more.
You can work completely within the Gantt Chart if you wish. Double clicking on a task description to the left or a bar on the right will open that task for editing. You can also "Drag and Drop" and "Resize" the bars on the Gantt Chart to change things like the task start date or task duration.
Column Preferences let you choose which information about your tasks you want to show on the Gantt Chart. Just by checking the Show box to the left of each field, you can have that information appear on the left side of the Gantt Chart. You can also check the box for Show on Bar, and that information will appear next to the task bar on the right side of the Gantt Chart Chart.
The Width column lets you change
how wide to make that field appear on the left side of the Gantt Chart.
You can also manually extend the field on the Gantt Chart by clicking
and dragging the field box. This value this box displays is the set width
for each field and will adjust as you change things.
The Order column lets you rearrange
the order of the columns that appear on the left side of the Gantt Chart.
You can change the Font, time scale, and change between weekly and monthly views.
The Sorting section is extremely
useful. It dicates how the entire Gantt Chart is sorted. The options that
you'll want to get to know in this section are
Primary Sort and
Secondary Sort. We recommend to
use Job # as your Primary Sort.
This will group all tasks together based on the Job they are assigned
to. For Secondary Sort, we recommend to use
Task #. This will then sort all
tasks in each Job based on the Task # they are assigned.
Important! In order to use the Task # as
the secondary sort, you'll need to assign a Task #
to each task. When sorting by Task #, tasks without a Task # will be treated
as if they have a value of '0' so they will always appear above tasks
that have Task #'s.
An alternative to this is to choose the Sorting option
Same sort pattern as the Task List.
This will automatically detect which way your tasks are sorted on the
Task List and match that on the Gantt Chart. We highly recommend to use
the Job # and Task # as your Primary and Secondary sorts.

- The Gantt Chart is part of the Task Manager. You can view the Task Manager as either a list of tasks, or as a Gantt Chart.
- The same information appears on the Task Manager and the Gantt Chart.
- You can use the Gantt Chart Settings to customize the look and sorting order of your tasks.

You can find Remote VirtualBoss by going to Options, then click on Remote VirtualBoss.
If you're on a support plan, we can set this up for you! If you're
not on a support plan, we have a
Helpful Setup Guide that covers how to set up your Remote VirtualBoss
website on your computer.
On newer versions of VirtualBoss (5.08 build 320 and up), Remote VirtualBoss
is installed automatically when you install PC VirtualBoss. You can access
the site locally by clicking this link.

You can access your website through any smartphone (such as Android/iPhone) and tablet devices including the iPad. Any device that can browse the web can use Remote VirtualBoss.
To create new logins for Remote VirtualBoss, go to the Users tab in the preferences.
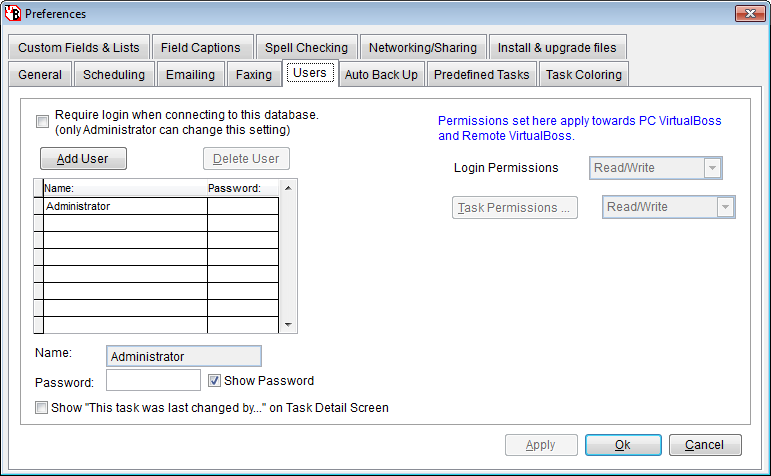
The Administrator login is created by default and its permissions cannot be changed. You can change the Administrator password, by default it is blank.
Next, create a smart Name for the new user and provide a password (optional).
| Name: | |
| Password: |
You can now set Permissions for this user by changing the Login Permissions.
Now we'll set the Person's Name field to his contact record "Gumpf, Brad".
| Person's Name |
This will now only show tasks assigned to Brad Gumpf whenever "Brad" logs in to Remote VirtualBoss.
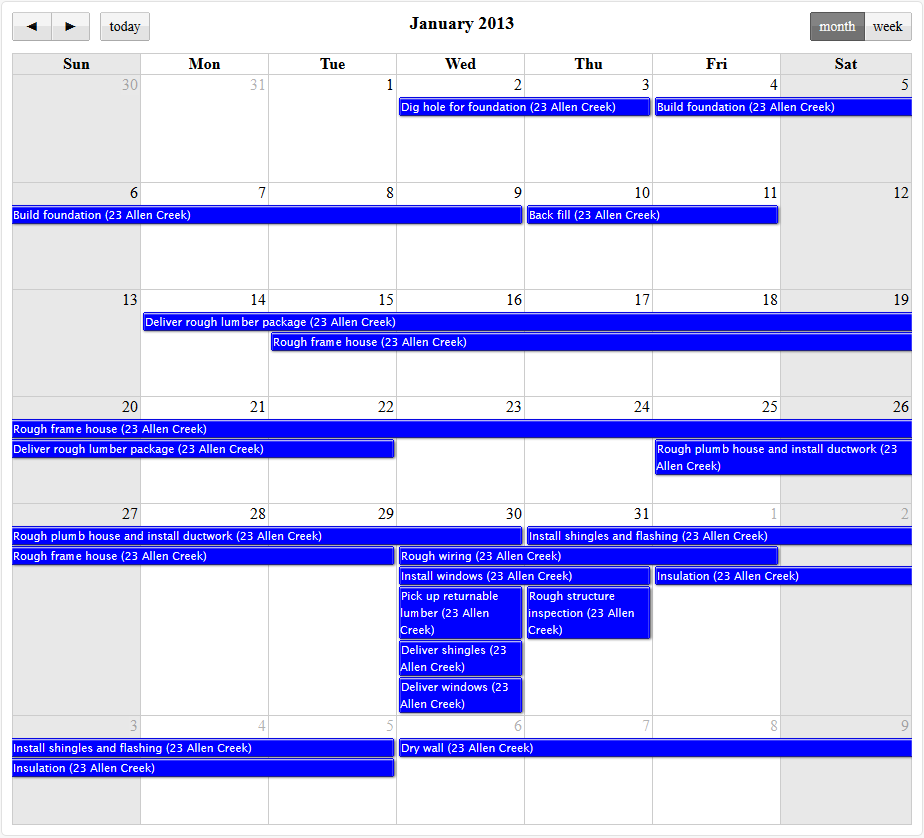
With the release of build 318, Remote VirtualBoss now has a drag-and-drop style calendar! To access the calendar view, go to your Remote VirtualBoss website and click onfrom the Task List. If you do not see the Calendar View button, check the version of your software to make sure you are on version 5.08 build 318 or later. You can find the version and build of your software by going to Help, About VirtualBoss. If you would like to upgrade your software, please visit our online store. You can also try out this calendar on our demo website.
With the release of build 346, Remote VirtualBoss now has a Gantt Chart View! If you do not see the Gantt Chart button, check the version of your software to make sure you are on version 5.08 build 346 or later. You can find the version and build of your software by going to Help, About VirtualBoss. If you would like to upgrade your software, please visit our online store. You can also try out this Gantt Chart on our demo website.
This Gantt Chart view will work with all modern browsers such as IE10+, Firefox, Chrome, Safari, Opera. If you use an older version of Internet Explorer, and this Gantt Chart does not display properly, we highly recommend you upgrade your browser. For best results, use Firefox or Chrome
You can update your schedule from this Gantt Chart view by clicking on the task description on the left side, or clicking the task bar on the right side. You can drag the task bars left or right to change the start dates; resize the bars to increase/decrease duration. Changes will take place and save immediately. Please note that there is no "undo" option.
By clicking on the arrow to the left of the task description, the page will automatically scroll to the right to give you quick access to that task where it sits on the chart. This is useful if you have a very long schedule and want to quickly find it.
The Gantt Chart can show weekends with the daygrid option (but does not currently show other "days off")
Internet Explorer Users: If you experience a problem where you are being re-directed back to the Remote VirtualBoss login screen whenever you try to save or click on a task, please follow these instructions to correct the problem.
Move VirtualBoss to Another Computer
Sometimes you may find it necessary to move your copy of VirtualBoss to another computer. This process is very easy and can be done in just a few steps.
 |
Step 1)
Create a backup of your database. This can be done by going to File, then click on Backup. Give your Backup file a good name and save it to a location you'll
be able to find. |
 |
Step 2)
On your new computer, install VirtualBoss from an install file
or by downloading from our website. Browse for and choose your Backup file and press ok. You can now remove the software from your old computer. Uninstalling
VirtualBoss automatically de-registers the license for use on another
computer. |
Duplicating Jobs and Job Templates
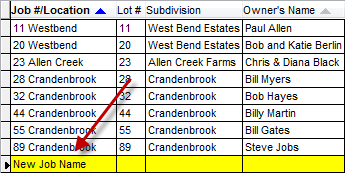
Duplicating Jobs in VirtualBoss is very easy. You can re-use any Job you've ever entered into VirtualBoss. This section will talk about how to duplicate an existing Job and how to work with Templates in VirtualBoss. Let's start by opening the Job Manager. In this example we have 2 Jobs in the Job Manager - 23 Allen Creek and 20 Westbend.

If we wanted to duplicate 23 Allen Creek, all we need to do is highlight that Job as shown above and click [Duplicate Job]. There is also a Right-Click menu option to do this as well. After you click duplicate, you'll be given a few options on what you would like to copy from your old job to your new one.
In most cases, you'll just want to have the All tasks checked. This will tell VirtualBoss to copy all the tasks from 23 Allen Creek to our new Job. At the bottom of the window you have 2 choices: and . If your new Job doesn't exist yet, you'll want to choose to Create a new job and copy information to it. If your new Job has already been created, you can copy tasks into it by choosing Copy information to an existing Job.
Give your Job a new name and hit yes to the confirmation box on the following screen. That's all there is to duplicating a job! if you want to view your new job, you can select it on the Job List and click on , which is located right next to the duplicate button. This is the same as going into the filter options and choosing your new job to filter by.
To make a job a template in
VirtualBoss, you'll need to find the template job setting. To find this
option, double click on the job you wish to make a template; this will
pull up its detail window. It's located in the lower left corner of the
screen.
Tip: Any job in VirtualBoss can be
a "template" in the traditional sense, you don't need to have it specifically
marked as a template in order to use it as one.
The only difference between a normal
job and a template job
in VirtualBoss is that template jobs are
hidden from all lists and reports.
This is done to ensure there are no changes made to them accidentally.
Important: Template Jobs are also hidden
on the Job List by default!! If you need to edit them, you'll need to
check
Show template jobs at the bottom
of the Job Manager. If you want to edit
tasks in a template job, you'll need to uncheck the Template Job
checkmark for that job so you can view your tasks again.
We recommend to only use the Template Job option on jobs you know are
as perfect as you can make them and that require as little modification
as possible. Otherwise, it's usually easier to leave them as normal jobs
for quicker access.