On a Support Plan? We can help!
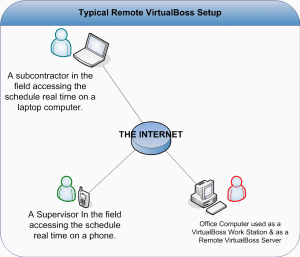
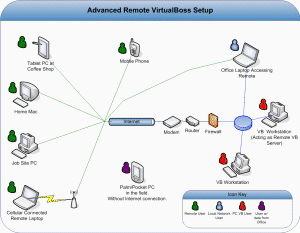
For Software versions 4.0 through 5.8 build 316, please follow this guide:
Step #1: Install VirtualBoss on your Computer
If you have not already done so, download VirtualBoss to your computer and follow the installation instructions.
It's important to note that Remote VirtualBoss is only available in versions 4.0 and up. If you're using an earlier Version, a free update is available!
Step #2: Install a web server software
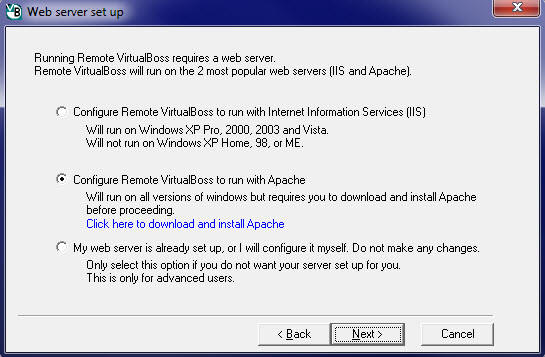
You can choose between two web server programs:
- Microsoft Internet Information Services (IIS)
- Apache
The choice is up to you, though we find Apache easier to use and recommend it. Click a choice below for setup instructions.
IIS
Windows has a built in Web Server software called Internet Information Services (commonly referred to as IIS). As a Windows user, IIS may already be installed by default on your computer. Although, it is not uncommon for this service to not be turned on or installed by default with your computer.
To see if IIS is installed, go to the Control Panel of your computer and click on Administrative tools.
If you see Internet Information Services there, it's already installed and you're ready for Step #3.
If you do not see it here, you'll need to install it. You can typically do this by clicking Start, and choosing Computer. From here, click on Uninstall or Change Program.
Then click on Turn Windows Features on or off.

Once installed, go to Step #3
Apache - (Recommended)
In our opinion, Apache is a bit easier to manage than IIS. If you don't have IIS installed, you may consider Apache as your web server of choice. You will need to download a special version of Apache to work with Remote VirtualBoss. Click here to download Apache web server from our website.
During the installation, you'll come across a Server Information screen. Please fill in this information in the appropriate fields:
- Network Domain: localhost
- Server Name: localhost
- Administrator's Email: any email address is fine
- for All Users, on Port 80, as a service -- Recommended.
only for the Current User, on Port 8080, when started Manually.
After this step, Apache should finish configuring itself and open a web page showing you the "Localhost", or default website on your computer. Now we're ready for Step #3. Please see our Apache Troubleshooting section for common issues and ways to resolve them.
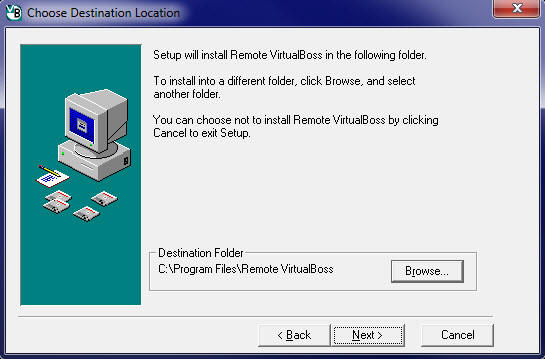
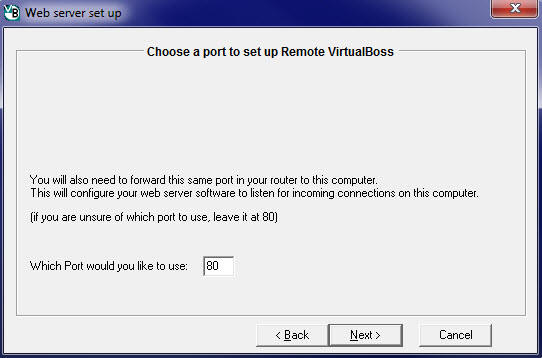
Step #3: Install Remote VirtualBoss
Use these images as a reference guide to configure Remote VirtualBoss:
Step #4: Configure Your Router
- Access to your Router
- Some knowledge on port-forwarding
A nice reference guide on Port Forwarding for most routers can be found on Port-Forward.com
Find your router on this page by looking up its name and model #. Follow the "default port-forwarding guide" for your router to set up a simple port forward to you computer.
After you've set up your port forward rule, you can test to see if it's working with this easy to use Port Checking Tool.
What's next?
Now that your website is set up and your router configured, you'll want to start accessing your website remotely. Your website works like any other website on the internet. The only difference is that you are in control of it! Your computer is running the website so it's important to remember that if your computer is turned off, the website is not available.
Your website address: http://216.73.216.11
You may also want to consider using a DNS update client to make it easier to remember your website address.
There are many free services that you can use. No-IP is one we recommend.
If you get stuck and are on a Support Plan with us, we can help!